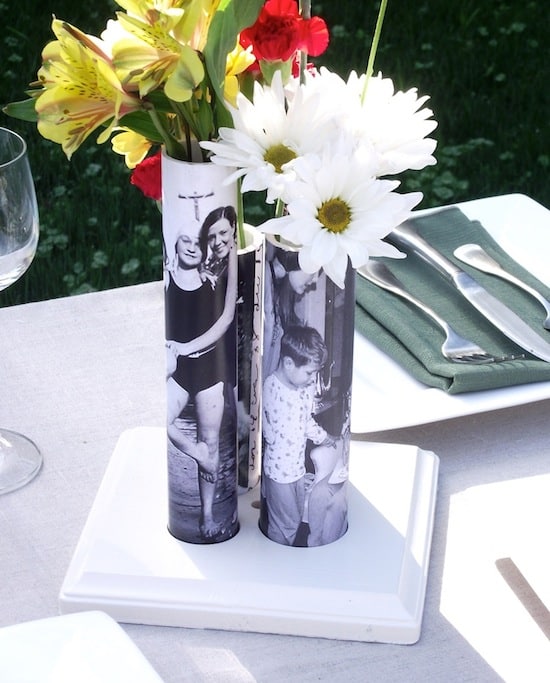
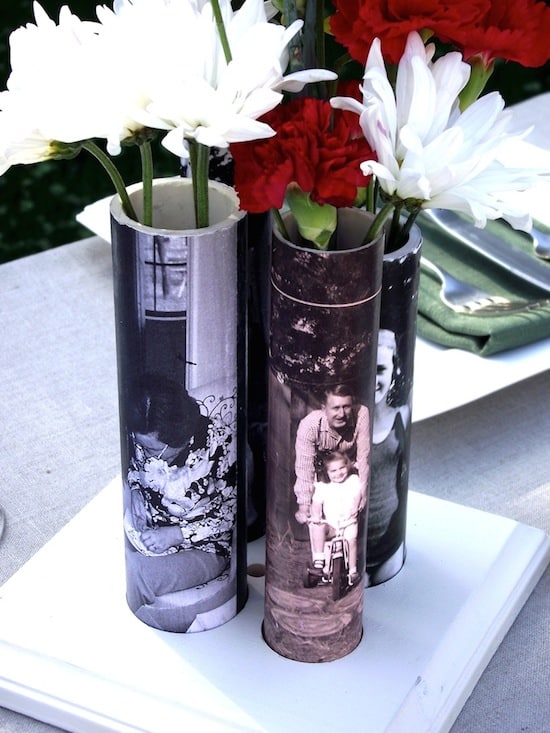
You won't believe this genius Mother's Day craft idea – David makes photo vases out of PVC pipe! He added personalized images to turn these DIY vases into the perfect gift.
Skills Required: Intermediate. You can opt to use a miter saw or have the pipe cut for you. Drilling into the wood plaque to seat your pipes is optional. Your only challenge might be Mod Podging the laserjet photo images to the pipes without wrinkles, so you should have some Mod Podge experience.
If you don't have Mod Podging experience, it doesn't mean you can't try! But I would do a test on a small piece of pipe first.
 Everybody has a mom, even Man Podger David. No, he wasn't brought down on a crafty alien spaceship, though sometimes his projects are out of this world! That was a horrible joke, by the way.
David's decoupage gift for Mother's Day is a collection of photo vases made out of PVC pipe, so even though my joke was bad, it was completely true. Here's how he made these DIY vases.
————–
I’m getting a lot of requests for Mother’s Day themed items at my Etsy store, so I had the holiday on the brain when I visited Home Depot recently. I found myself, as I often do, in front of all the PVC piping thinking “there must be something I can make out of this!”
There are so many great shapes and sizes and it’s all so affordable, but I’ve never been able to come up with anything. And it suddenly dawned on me that I could use the various pipes to make DIY vases.
And then I thought, why not decoupage the pipes in old pictures and make fun, nostalgic photo vases for a Mom’s Day celebration? For a total cost of about $12.
![DIY vase from a pipe - supplies]() Photo Vases for Mother's Day
Photo Vases for Mother's Day
 Photo Vases for Mother's Day
Gather These Supplies
- PVC pipes of various widths
- PVC caps to fit the pipes
- PVC pipe cement
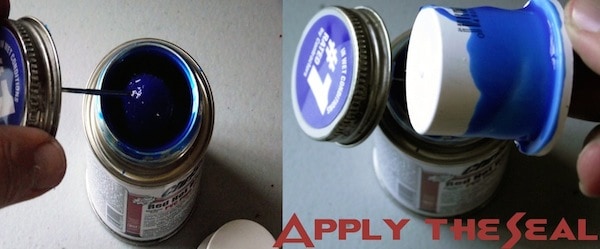
- Outdoor Mod Podge
- Wooden plaque for a base, painted with the color of your choice (mine is from Michaels)
- Glue (I used E-6000)
- Laser copies of old photos
- Foam Brush (not pictured)
Tools
- Miter saw
- Forstner Bit and drill (optional)
Step 1. I cut the PVC pipe into various lengths ranging from 8″ – 11″ tall – just eyeballing what I thought was good. I used a miter saw, but any saw will cut through the plastic. If you purchase your PVC pipe from the home improvement store, you can ask them to cut it for you there (then you won't need a saw).
 Step 2. Next up (following the manufacturer’s instructions) I used the PVC cement to glue the caps to the bottoms of the pipes, and set them aside to dry. This guarantees that no water will escape the pipes through the bottom. If you don't plan to put water in the photo vases (if you're using fake flowers), you can skip this step.
Step 3. I then gathered and scanned some old family photos. I resized each photo to fit a specific pipe – I needed each photo to be tall enough and wide enough to wrap around its designated pipe. I also played a little bit with the tint of each picture to provide some contrast and a more vintage look.
Step 4. I printed the photos out onto plain paper using a laser printer. The laserjet ink is key – I knew I was going to soak the images in water and inkjet ink will run. Kinkos or Staples can make a laser copy for you if you need.
Soaking the Images
Why soak images for these DIY vases? Because this is the best way to apply images printed on laserjet to round surface with no wrinkles. You'll be surprised how well it works.
 Step 5. I dropped the image in some water and, while it soaked, I coated the outside of the PVC pipe with Outdoor Mod Podge. I then removed the image from the water and gently ran my fingers down it to remove excess water.
Then I applied the image to the pipe, using my fingers to smooth out bubbles etc. I decoupaged to seal where the ends of the paper overlapped (no top coat yet, just at the overlap). I did that for each pipe and then set them aside to dry.
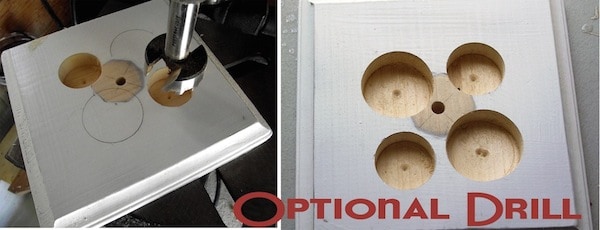 Step 6. This next step is totally optional. I used two Forstner bits to drill holes into the wood plaque so that my DIY vases would be seated. It gives the project a more finished look and provides extra stability.
Step 7. I gave the photo vases a sealing coat of Outdoor Mod Podge and, when that was dry, trimmed away any excess paper from the tops and bottoms.
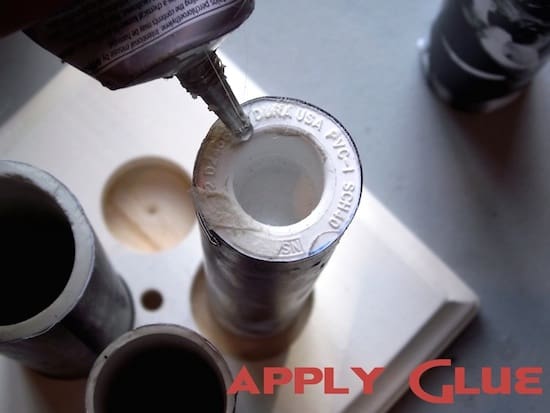 Step 8. Next I glued the tubes to the base using E-6000. (NOTE: If you didn’t drill the holes in step 6, then just glue the pipes directly to the base. I checked and it will work – my suggestion is that you cluster the pipes closer together so they touch each other to provide a little extra stability.)
After everything has had time to fully dry (24 hours), fill the pipes with water and insert flowers into your photo vases.
 Some further thoughts on this project:
1) I think next time I will paint the tops of the PVC pipes for a more finished look.
2) It occurred to me that this could become a very adaptable thing. If you used a thicker base and drilled deeper holes you could skip gluing the tubes in place and just let the base hold them. Then you could then decoupage other tubes with colorful graphics or fabric or what have you and, when you wanted to, swap out the tubes to suit your mood!
 I hope you enjoy my DIY vases. Don't forget to visit me at my blog, Etsy, or on Facebook!
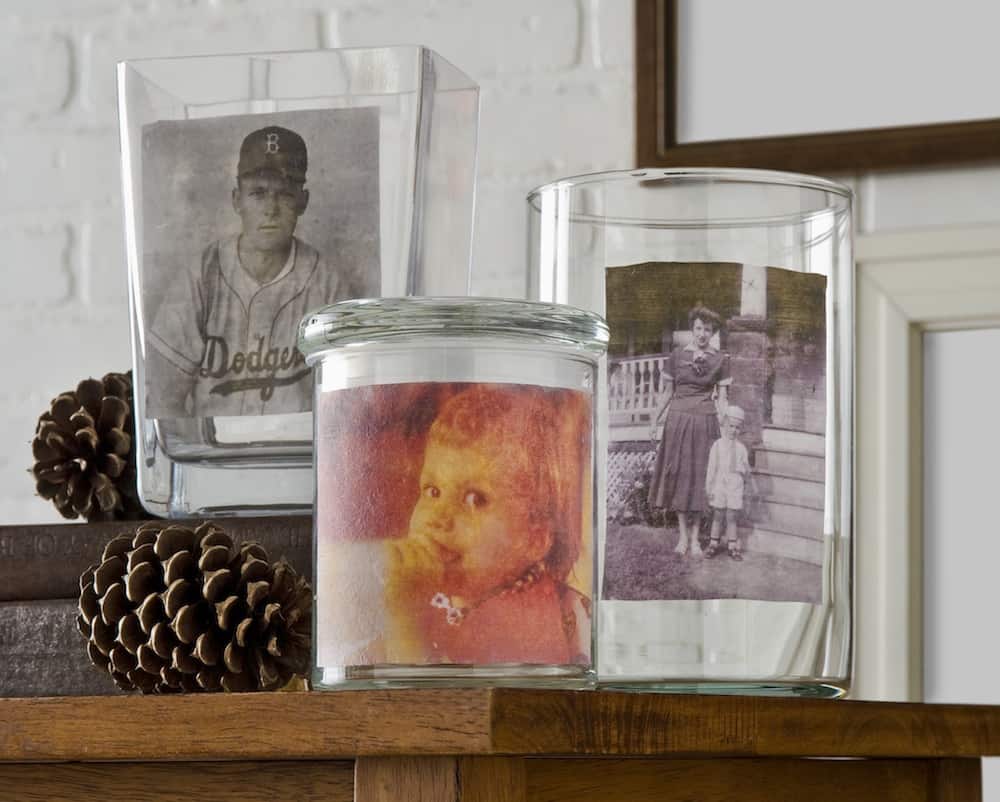
If you enjoyed this project, you're going to love these vintage Mod Podge photo transfer vases. You'll be making glass clings. it's really fun! Click on the image below to get the tutorial:
The post Mother’s Day Photo Vases from PVC ... appeared first on Mod Podge Rocks.


